Notice:
This post is older than 5 years – the content might be outdated.
Docker Plugins are an easy way to extend the capabilities of the Docker Engine. You can load third-party plugins to extend e.g. the Networking, Storage and Authorization capabilities of the Docker Engine. In this article we’ll show you the capabilities of plugins and walk you through the process of writing your own.
What types of plugins are out there
At the moment you can find three types of Docker Plugins:
Network: these allow you to use third-party container networking solutions like weave to connect your containers across multiple hosts or to set specific policies. This means you aren’t tied to the Docker Network and can easily use (virtually) any tool you want.
Storage/Volume: these allow you to use third-party container data management solutions to persist data on your hosts or across multiple hosts. With these plugins it’s much easier to run stateful applications inside containers than before. One of the first Volume Plugins was probably Flocker.
Authorization: allows to include third-party solutions for container authorization for example the twistlock plugin allows you to define which users can perform which actions.
Using Docker Plugins
If the core functionality provided by Docker doesn’t fit your need you are free to use any Docker Plugin that you want. Further this provides the users with the flexibility to simply use other core functionalities like network providers than the default Docker components and on the other hand it allows tool-creators to develop Docker Plugins that make it easier for other users to use their tools with Docker.
After you installed the Docker Plugin of your choice (there are different ways to do so) you can easily use them with the Docker CLI:
Networking
Creating a network is the same as with Docker Networking: just specify the driver which should be used and define some optional driver specific arguments with --opt key=value:
|
1 |
docker network create -d <driver-name> <options> Network |
If you want to use your newly created Network just use the network name from above when calling Docker run. The Docker engine automatically attaches the container to the network:
|
1 |
docker run --net Network centos:7 |
Volume
Using a Docker Volume Plugin is nearly the same as using a network plugin. When you create a volume with the Docker CLI you just have to specify the driver which should be used and the driver specific options:
|
1 |
docker volume create --driver quobyte --name MyDockerVol --opt user=docker --opt group=docker |
This command for example will create a persistent storage volume (in this case with Quobyte) , the owner of the Volume is user “docker“ and the group “docker“. Per default these optional values are defined as root.
Write your own Docker Plugin
If you are a tool-maker and want to write your own Docker Plugin there are many ways to do so. At first you are completely free to write the Docker Plugin in any language you want; just keep in mind to make it as easy as possible for users to use your Plugin (I think it wouldn’t be the best idea to use some “esoteric“ programming language which needs to install many dependencies, albeit it’s possible). If you choose golang as your programming language, Docker provides plugin-helpers to make it really simple to write your own plugin. Later we will learn in detail how to implement a specific Plugin. But first let’s have a look at the basics of Docker Plugins.
So at first a Docker Plugin is a process that runs (mostly) on the same machine or on a remote machine. The Docker Engine has a Plugin discovery to automatically detect (newly installed) Plugins on your machine and on remote machines. The Plugin Discovery has three ways to detect Plugins:
- Unix domain sockets: (.sock) the matching socket file must be located under /run/docker/plugins to be automatically detected.
- A spec file (.spec) , that contains a URL of the plugin e.q. unix://myplugin.sock or tcp://remote-host:8080
- Or a json spec file (.json) that contains a full specification of the plugin. You can find an example json specification in the Docker documentation.
Spec files can be located at /etc/docker/plugins or /usr/lib/docker/plugins.
To activate a Plugin the Docker Engine calls the endpoint /Plugin.Activate and as a result gets the plugin type that is implemented by this Plugin, e.g. VolumeDriver.
Writing a Volume Plugin (for Quobyte)
Now let’s have a closer look at how you can implement a Volume Plugin for Docker. In this case we will refer to the Quobyte Docker Plugin that I created with the help of Felix Hupfeld of Quobyte. We chose go as programming language mainly because of the go-plugin-helper and the ability to create static linked binaries. Assuming that you already have a working go environment you can easily get the go-plugin helpers with
|
1 |
go get -u github.com/docker/go-plugins-helpers |
Now you can simply import the go-plugin-helpers.
In the first step we implement the driver interface, that’s the core component of the Docker plugin that handles all request. The interface is specified as follows:
|
1 2 3 4 5 6 7 8 9 10 11 12 13 14 15 16 17 18 19 |
type Driver interface { Create(Request) Response List(Request) Response Get(Request) Response Remove(Request) Response Path(Request) Response Mount(Request) Response Unmount(Request) Response Capabilities(Request) Response } |
and a Response is defined as:
|
1 2 3 4 5 6 7 8 9 10 11 12 13 |
type Response struct { Mountpoint string Err string Volumes []*Volume Volume *Volume Capabilities Capability } |
Depending on the request you don’t need to set all fields in the Response struct. Now let’s look at the VolumeDriver methods:
- Create: is called when the user wants to create a volume. In our example this request results in an API call to the Quobyte registry that creates the requested Volume if possible. The user get’s an empty error as a result if everything goes well or the error message if something went wrong.
- Remove: is called when a Volume is deleted. The Response is the same as at creation.
- Mount: is called when a container wants to use the specified volume. The response contains an empty error and returns the mount point on the host for the specified volume.
- Path: is called to get the path of a volume mounted on the host. This request has the same response as mount.
- Unmount: is called when Docker doesn’t use a volume anymore and it’s probably safe to unmount it.
- Get: requests information about the specified volume and returns the name, mount point and optional status.
- List: lists all volumes and optionally the mount point of the volume.
- Capabilities: indicates if a volume has to be created multiple times (for every host) or only once.
When all these handlers are implemented all you have to do is to create a new driver object in your main file and add this to the volume handler. In a next step you can tell the handler to listen on a Unix socket or on a TCP socket. In our example we use a Unix socket that will be automatically created in /run/docker/plugins. When we start the driver, this is done by the go-plugin-helper.
|
1 2 3 4 5 |
qDriver := newQuobyteDriver(quobyteAPIURL, qmgmtUser, qmgmtPassword) handler := volume.NewHandler(qDriver) log.Println(handler.ServeUnix("root", quobyteID)) |
Quobyte Mount and Docker — what’s special
When you read the VolumeDriver.Mount you’ll notice that Docker suggests to mount each Volume individually and if a volume is used by multiple containers the Plugin takes track of how many containers are using the volume. If you use many different volumes on your system this will result in many separated mounts on the host, which will end up in a lot of memory management . When we created the Quobyte Docker Plugin we thought that it would be much more practical to do only one mount in /run/docker/quobyte/mnt. All Quobyte volumes can be found in this directory.
So we now have only one mount and we don’t need to track the volume usage. This allows us to use the Plugin even on distributions that don’t allow you to install packages, such as CoreOS. You can now use a Docker container to mount all Quobyte Volumes inside /run/docker/quobyte/mnt and the Plugin will know that it doesn’t need to mount the Quobyte Volumes again.
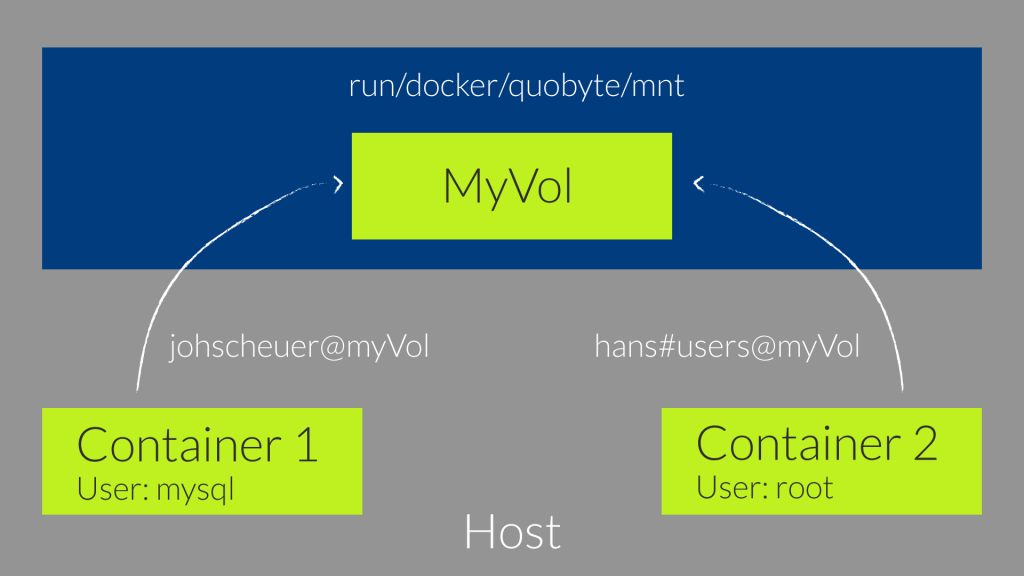
Another cool feature that will be introduced with Quobyte 1.3 are fixed-user mounts. The fixed-user mounts simply allow to mount all Quobyte Volumes inside one directory and use them as different users. All access to the Quobyte Volume will be rewritten to the specified user and group – both are optional, independent of the user inside the container.
The image below is an example for such a fixed-user mount. Inside container 1 all actions are done by the user mysql but on the Quobyte volume all reads/writes are executed as the user “johscheuer“. When we look at container 2 all actions inside the container are performed as root but access to the Quobyte volume is performed as user “hans“ in the group “root“. This allows to map the access to the real user and not to the user that runs inside the container.
Sadly this feature isn’t implemented in the current Docker Plugin of Quobyte. The reason why we didn’t implemented it yet is that there is no possibility to pass a user name or group to the Docker Plugin when starting a Container.

If you want to read more about Quobyte and containers you can have a look at the Quobyte website.
Conclusion
Docker Plugins allow an easy extension of the Docker Engine and enable users to replace core components without pain or combine different components. With the go-plugin-helpers it is pretty easy to write your own Docker Plugin for your favorite tool.
Read on
Want to know more about containers and the services we offer in IT Engineering? Visit our website, write an email to info@inovex.de or call +49 721 619 021-0!
Join us!
Looking for a new job in Karlsruhe, Munich, Stuttgart, Cologne or Hamburg? We’re hiring Big Data Systems Engineers (m/w/d)!


Hey I followed your steps however I am getting error here is the log for it
ljaliminche@DDNINR0345:~/go/src/docker-volume-plugin-example$ go get -u github.com/docker/go-plugins-helpers
package github.com/docker/go-plugins-helpers: no Go files in /home/ljaliminche/go/src/github.com/docker/go-plugins-helpers
ljaliminche@DDNINR0345:~/go/src/docker-volume-plugin-example$ go build
# github.com/docker/go-connections/sockets
../github.com/docker/go-connections/sockets/sockets.go:35:26: dialer.DialContext undefined (type proxy.Dialer has no field or method DialContext)
../github.com/docker/go-connections/sockets/sockets_unix.go:24:28: undefined: context