Welcome to part 2 of this article series about data orchestration. In this part, we want to discuss Airflow’s weaknesses and how our first competitor, Prefect, differs from Airflow. For an introduction to Airflow and the article series, please read Part 1 first.
Airflow’s weak points
Airflow tries to market itself as a data orchestration tool but Airflow is a job scheduler with extras. For instance, Airflow’s tasks are working like black boxes, Airflow does not know what happens inside these black boxes. There is no data asset awareness.
Furthermore, Airflow’s learning curve is very steep. You have to invest a lot of time when onboarding junior data engineers. While Airflow’s documentation is verbose, it is still lacking details in a lot of areas like testing.
Moreover, the approach that Airflow follows is not the most intuitive one. XComs which is responsible for the handling of task cross-communication feels unintuitive. Another restriction which is posed by XComs is that it should be only used to exchange metadata. Also, getting to know the most important operators takes time and patience. Undeniably, testing Airflow pipelines is far from easy, e.g., mocking requires knowledge of Airflow’s internal machinery.
And if you thought one second about running Airflow on Windows, forget it. There were workarounds for some Airflow versions but they were too hacky. To mitigate this problem, you can simply install Airflow on WSL or simply use Docker.
Airflow’s abstractions are also outdated. Back in 2015, it was completely normal to think about workflow orchestration in terms of tasks. Tasks that have dependencies between each other. So Airflow’s choice to abstract the relation between tasks through a DAG is relatable. Also, one wants to mitigate bugs like infinite running jobs when two tasks would be called in a cycle. But this makes Airflow also less flexible.
Today, we want to focus less on the technicality behind data orchestration. We want to focus more on what kind of data we need and want!
Airflow’s User Survey 2022
When having a look into Airflow’s User Survey 2022, which gathered 210 responses in two weeks, Airflow users reported the following. Airflow could especially improve in the following top 4 areas: Web UI (49.5 %), Logging, Monitoring & Alerting (48 %), Onboarding Documentation (36.6 %), and Technical Documentation (36.6 %).
Airflow’s web UI
Undoubtedly, Airflow’s web UI was revolutionary back in 2015. But it did not improve much over time and is rather old-looking by now. For example, most of the time you will probably look at the “Grid“ view to monitor your runs. If you want to see the execution timeline, you will probably switch to the “Gantt“ view. The UI would feel more modern if the Gantt view would be embedded into the Grid view, e.g., when clicking on a particular run would open a popup displaying the Gantt view. Airflow could also utilize its space better to improve its UI, e.g., increasing the size of the diagrams or enabling more customizations.
Logging, Monitoring & Alerting
Logging, Monitoring & Alerting have become more and more important. Although Airflow has a logging and monitoring architecture, it is inflexible. Airflow recommends sending metrics to StatsD to expose them to Prometheus. You can also capture logs with FluentD and send them to Splunk or ElasticSearch. Naturally, you can also use cloud vendors to store your logs. But if you want to build your own logging and monitoring infrastructure, it can become quite difficult with Airflow.
Documentation
Last but not least, Airflow’s documentation could improve. The structure of the documentation needs getting used too. Sometimes it is not easy to find what you currently need. For example, the documentation on testing in Airflow is listed under “Best Practises“. I would expect a dedicated page for testing since this is an important topic. On top of that, the documentation about testing is quite short and insufficient for all users who want to thoroughly test their pipelines. We will discuss this in the 4th part of this article series.
Airflow also does not support workflow versioning, although I think this will be released in the foreseeable future. This feature is also highly ranked in the user’s wishlist. Furthermore, it is difficult to set up staging environments for Airflow and debugging is not trivial.
To sum up, Airflow has many areas which need to be improved. Many weak points are no show-stoppers but the main question remains: Are Airflow’s abstractions suitable for data orchestration or will this lead to the end of Airflow’s era? To find this out, we will have a look at two newer rivals of Airflow: Dagster & Prefect. Can they overcome Airflow’s weaknesses and strengths? In this part of the article, we will have a look at Prefect, and in the 3rd part of this series at Dagster.
Prefect
Prefect was founded in 2018 and has its headquarters in Washington. Prefect writes the following about itself on the homepage:
“Orchestrate and observe all of your workflows, like air traffic control for your data.“
Prefect promises that you can focus more on your business-critical code and less on boilerplate code. We will see if this is true, so let’s start building our example pipeline from part 1 of this article series in Prefect!
Prerequisites
Installing Prefect is very easy, create a Python virtual environment and then execute the following command inside of your virtual environment:
|
1 |
pip install prefect |
At this time of writing, I use version 2.6.9 for Prefect. While we are at it, also install the dependencies which we will use:
|
1 |
pip install pandas plotly psycopg2 pytest python-dotenv |
That’s it, we can start developing our pipeline! Note, that Prefect offers an open-source version and a cloud offering. We will only focus on the open-source version of Prefect.
Project structure & flow definition
Prefect is much more flexible than Airflow when it comes to the project structure. Thus, we will use the project structure depicted in figure 1.
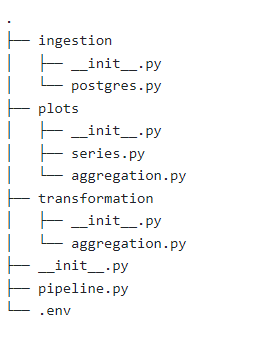
This project structure is very similar to what we had in Airflow. But it is more isolated since we don’t have one common directory where we have to store our pipelines. This makes local development easier in Prefect.
Next, we have to write out our pipeline definition. For that, write the following code into pipeline.py:
|
1 2 3 4 5 6 7 8 9 10 11 12 13 14 15 16 17 |
from prefect import flow from prefect.task_runners import ConcurrentTaskRunner @flow( name="Franchise Analysis Pipeline", description="Generating insights for franchises", version="franchise_pipeline_v1", retries=0, timeout_seconds=120, validate_parameters=True, task_runner=ConcurrentTaskRunner ) def franchise_analysis_flow(): pass if __name__ == "__main__": franchise_analysis_flow() |
By the way, Prefect uses the terminology of flows instead of pipelines. Prefect defines a flow as follows:
“A flow is a container for workflow logic and allows users to interact with and reason about the state of their workflows.“
To create such a flow, you have to decorate a function with the flow decorator. After that, we specify the following arguments:
- name: The name of the flow
- description: Text describing our flow’s purpose
- version: A string that specifies our current version, this is used for versioning flows
- retries: The number of times Prefect should re-run the flow if the flow fails
- timeout_seconds: Time in seconds which specifies when our flow should get interrupted if it did not finish yet
- validate_parameters: Boolean which tells Prefect whether it should validate parameters or not
- task_runner: Specifies the Task Runner that Prefect should use. ConcurrentTaskRunner is the default one – which will switch the task when one task is io-blocking.
As a next step, let’s code our tasks.
Task: postgres ingestion
The code for the ingestion task will look very similar to what we had in Airflow. But it is worth going over it to point out the differences. Copy & Paste the following lines of code into the file postgres.py inside of the ingestion directory:
|
1 2 3 4 5 6 7 8 9 10 11 12 13 14 15 16 17 18 19 20 21 22 23 24 25 26 27 28 29 30 31 32 33 34 35 36 37 38 39 40 41 42 43 44 45 46 47 |
import os import csv import psycopg2 import prefect from dotenv import load_dotenv def get_db_connection_string(): load_dotenv() return {'host': os.getenv("DB_HOST"), \ 'port': os.getenv("DB_PORT"), \ 'user': os.getenv("DB_USER"), \ 'password': os.getenv("DB_PW"), \ 'database': os.getenv("DB_DB")} @prefect.task( name="Franchise Postgres API", description="Fetching franchise revenue data from Postgres database", tags=["postgres", "franchise", "raw", "revenue"], version="franchise_postgres_v1", retries=0 ) def ingest_franchise_data_from_postgres(target_dir: str): db_info = get_db_connection_string() sql_statement = """ select id, manager_name, city, street, street_number, revenue, day from store; """ connection = psycopg2.connect(**db_info) cursor = connection.cursor() cursor.execute(sql_statement) result = cursor.fetchall() connection.commit() target_file = f"{target_dir}/store.csv" os.makedirs(os.path.dirname(target_file), exist_ok=True) with open(target_file, 'w', newline='') as file: target_csv = csv.writer(file) target_cs.writerow(['id', 'manager_name', 'city', 'street', 'street_number', 'revenue', 'day']) for row in result: target_csv.writerow(row) return target_file |
For this little experiment, we will store our secrets/configuration variables inside an environment file. But for the interested reader, I recommend you to check out the concept of Blocks which enables you to store your configurations/secrets in external storage systems. For example, you could use HashiCorps Vault to store your secrets which I can highly recommend.
Furthermore, we can enrich our task with metadata and version it. One tip, when you use git to version your code, you can use the git commit id as a version for your tasks and flows. The business logic is very similar to what we had in Airflow except that we use psycopg2 to communicate with our postgres database since we do not have the concept of operators/hooks here.
That’s it, let’s implement the time series plot next.
Task: revenue per day per manager plot
This will be also very similar to what we coded in Airflow. Create the file series.py inside of the plotting directory. The code which should go inside the file looks like this:
|
1 2 3 4 5 6 7 8 9 10 11 12 13 14 15 16 17 18 19 20 21 22 23 24 25 |
import os import pandas as pd import plotly.express as px import prefect @prefect.task( name="Franchise Revenue Time Series Plot", description="Plotting revenue vs. time (each day)", tags=["franchise", "revenue", "time-series", "plot"], version="franchise_series_plot_v1", retries=0 ) def plot_revenue_per_day_per_manager(base_dir: str, source_file: str): target_file = f"{base_dir}/plots/revenue_per_day_per_manager.html" os.makedirs(os.path.dirname(target_file), exist_ok = True) df = pd.read_csv(source_file) fig = px.line(df, x='day', y='revenue', color='manager', symbol="manager") fig.update_layout( font=dict( size=20 ) ) fig.write_html(target_file) |
At this point, you might ask how Prefect establishes dependencies between tasks. If you take a closer look at this implementation, you can see that plot_revenue_per_day_per_manager accepts an argument source_file. Depending on what we will pass to this function for the source_file argument, Prefect will infer the dependencies. We will see this slightly later. By the way, you don’t have to choose this particular name for the argument, you can name it whatever you want.
Other than that, the code should be relatively self-explanatory. The task-based approach is close to what Airflow does. We can just pass other arguments to the task decorator and we can easily utilize pydantic in Prefect. We gave source_file the type hint str but we could also use a pydantic base model instead for more complex object validations. We can also use pydantic to obscure secret values, such that those will not be displayed when printing variables or objects associated with it. But this is just a side note, we will not use it here.
Task: average revenue per manager aggregation
Without losing too many words, the following code inside of aggregation.py in our transformation directory shows how we can transform our dataset in Prefect:
|
1 2 3 4 5 6 7 8 9 10 11 12 13 14 15 16 17 18 19 20 21 22 23 24 25 26 |
import os import pandas as pd import prefect @prefect.task( name="Franchise Average over Revenue Aggregation", description="Computing the average of revenue for each franchise", tags=["franchise", "revenue", "average", "aggregation"], version="franchise_average_aggregation_v1", retries=0 ) def aggregate_avg_revenue_per_manager(base_dir: str, source_file: str): target_file = f"{base_dir}/storage/agg_avg_revenue_manager.json" pickle_file = f"{base_dir}/storage/agg_avg_revenue_manager.pkl" os.makedirs(os.path.dirname(target_file), exist_ok=True) df = pd.read_csv(source_file) result = df[["manager", "city", "street", "street_number", "revenue"]].groupby(["manager" "city", "street", "street_number"]).aggregate('mean') result["average_revenue"] = result["revenue"] result = result.drop(columns=["revenue"]).reset_index() result.to_pickle(pickle_file) result.to_json(target_file, orient="records") return pickle_file |
The business logic here is the same as in Airflow. By the way, since we are exchanging only a small amount of data between tasks, Prefect will simply keep the results in memory but it might happen to you that you want to exchange data that is larger than your system’s memory. What you can do in this scenario is to persist your results to a storage location. To persist your results, you have to configure a serializer and a storage location. These can be configured on the task and flow decorators with the following arguments:
- persist_result: Whether it should store the result
- result_storage: Where to store the result
- result_serializer: How to serialize the result
For instance, if you want to store the result of a flow on Google Cloud Storage (GCS), you can do the following:
|
1 2 3 |
from prefect.filesystems import GCS my_custom_flow = pipeline.with_options(result_storage = GCS(bucket_path = "<bucket_path>")) |
where pipeline is a flow. So as you can see, it is very easy to configure another storage location. If you want to read more about this topic, I can highly recommend Prefect’s documentation. Let’s continue with our plotting task.
Task: average revenue per manager plot
To finish off our tasks, Copy & Paste the following content into aggregation.py inside of the plotting directory:
|
1 2 3 4 5 6 7 8 9 10 11 12 13 14 15 16 17 18 19 20 21 22 23 24 25 26 27 28 |
import os import pandas as pd import plotly.express as px import prefect @prefect.task( name="Franchise Plot Aggregation", description="Plotting the average revenue for each manager in the franchises", tags=["franchise", "revenue", "plot", "aggregation"], version="franchise_average_plot_v1", retries=0 ) def plot_avg_revenue_per_manager(base_dir: str, pkl_file: str): target_file = f"{base_dir}/plots/agg_avg_revenue_manager.html" os.makedirs(os.path.dirname(target_file), exist_ok=True) df = pd.read_pickle(pkl_file) fig = px.bar(df, x='manager', y='average_revenue', hover_data = ['city', 'street', 'street_number'], labels= {'average_revenue': "Average Revenue by Manager", 'manager_name': "Manager"}) fig.update_layout( font=dict( size=20 ) ) fig.write_html(target_file) |
As you see, if you are on Airflow but you would like to migrate to Prefect, Prefect makes it easy for you since the programming approach of our tasks is very similar.
Now, we are ready to define the task dependencies and are ready to kick off our flow. Therefore, let’s make some adjustments in our pipeline.py file which are the following:
|
1 2 3 4 5 6 7 8 9 10 11 12 13 14 15 16 17 18 19 20 21 22 23 24 25 26 27 28 29 30 31 32 |
import os import prefect from prefect.task_runners import ConcurrentTaskRunner from ingestion.postgres import ingest_store_data_from_psql from transformation.aggregation import aggregate_avg_revenue_per_manager from plotting.series import plot_revenue_per_day_per_manager from plotting.aggregation import plot_avg_revenue_per_manager @prefect.flow( name="Franchise Analysis Pipeline", description="Generating insights for franchises", version="franchise_pipeline_v1", retries=0, timeout_seconds=120, validate_parameters=True, task_runner=ConcurrentTaskRunner ) def franchise_analysis_flow(): base_dir = "./data" os.makedirs(base_dir, exist_ok=True) csv_file = ingest_store_data_from_psql(base_dir) plot_revenue_per_day_per_manager(base_dir=base_dir, source_file=csv_file) pkl_ile = aggregate_avg_revenue_per_manager(base_dir=base_dir, source_file=csv_file) plot_avg_revenue_per_manager(base_dir=base_dir, pkl_file=pkl_file) if __name__ == "__main__": franchise_analysis_flow() |
If you followed part 1 of this article series, you might remember that this looks quite similar to what we had in Airflow with the TaskFlow API. Prefect can infer the dependencies based on which return value of a task is given as input to the next task.
Flow run
Let’s run this flow and see what kind of information Prefect will display on its UI. Open a terminal in our root working space directory and execute the following command:
|
1 |
prefect orion start |
This command will display a URL on your terminal (by default localhost:4200) which leads you to Prefect’s UI. You should see something similar to figure 2.
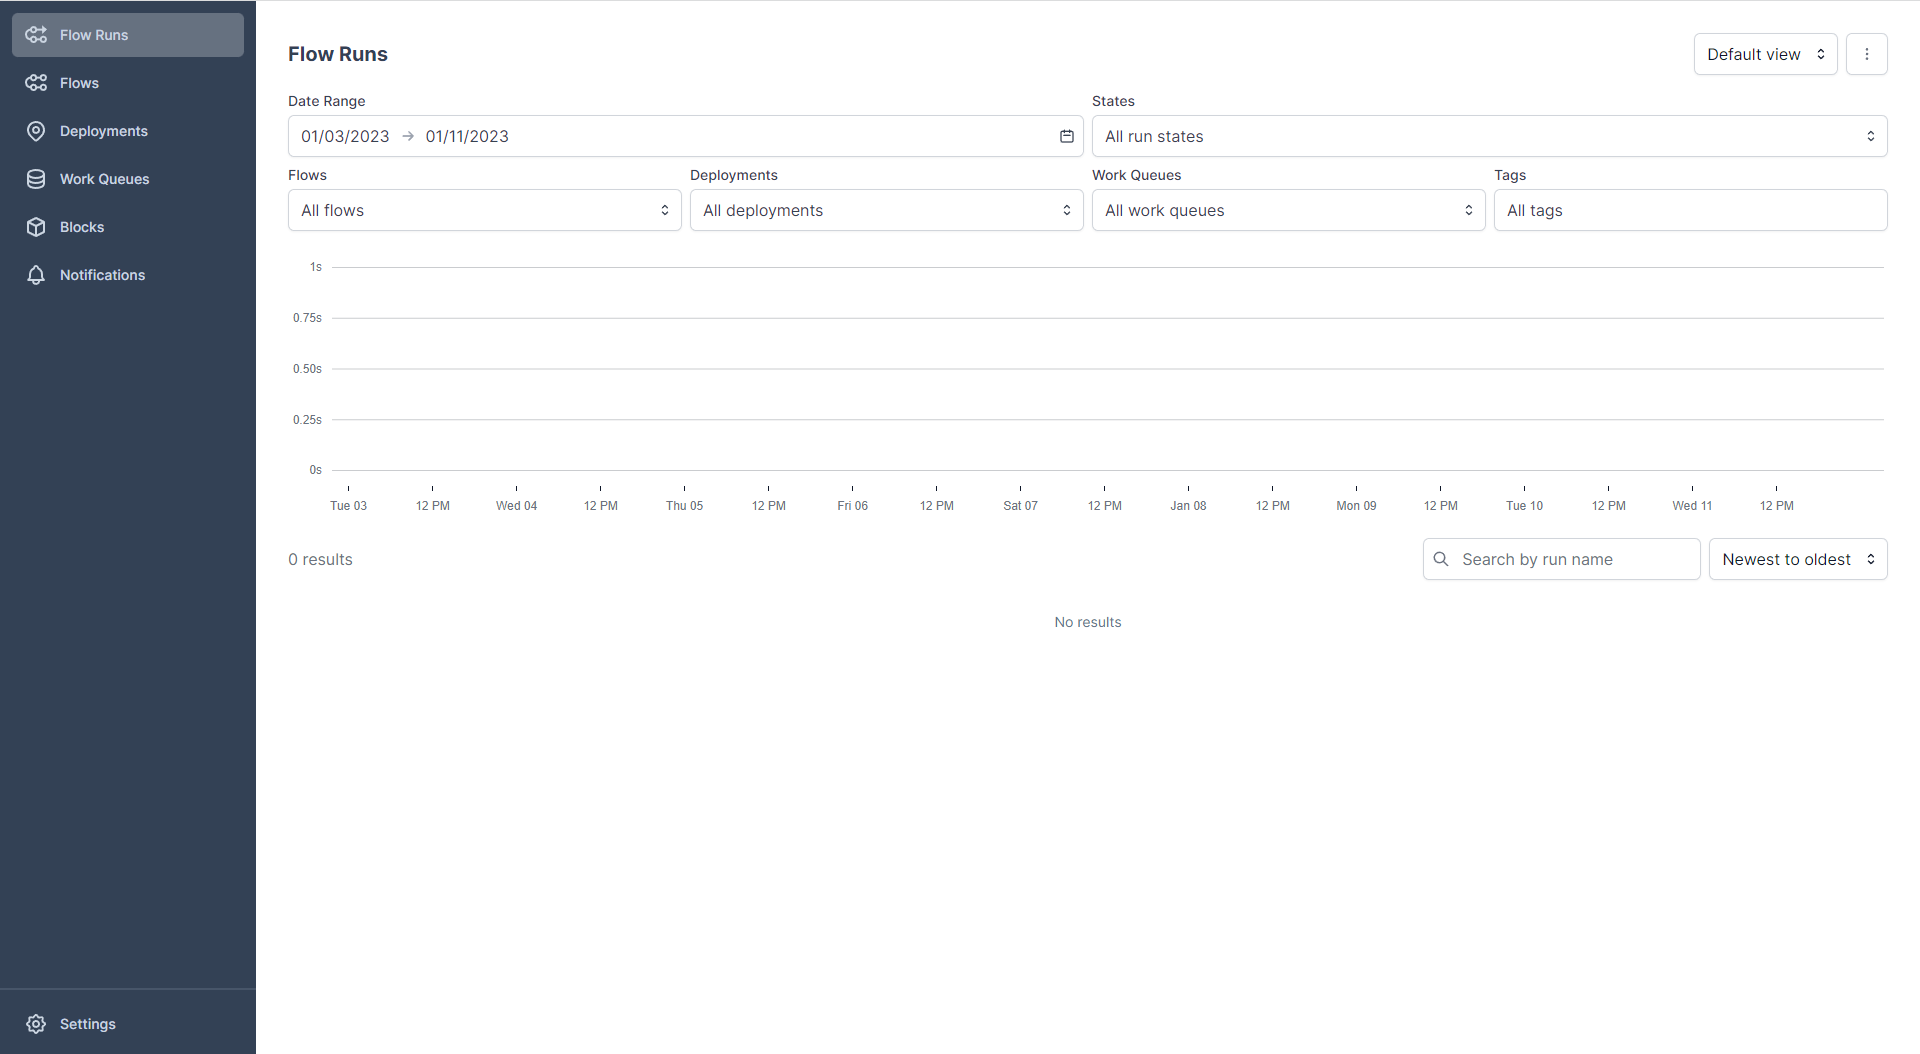
Open another terminal in your working directory and run:
|
1 |
python pipeline.py |
Since we decorated our flow with the flow decorator, Prefect will know that we want to run a flow. Prefect will exchange data with the Orion Server such that we can record the run history. After running this command, you should see a change in the UI as depicted in figure 3.
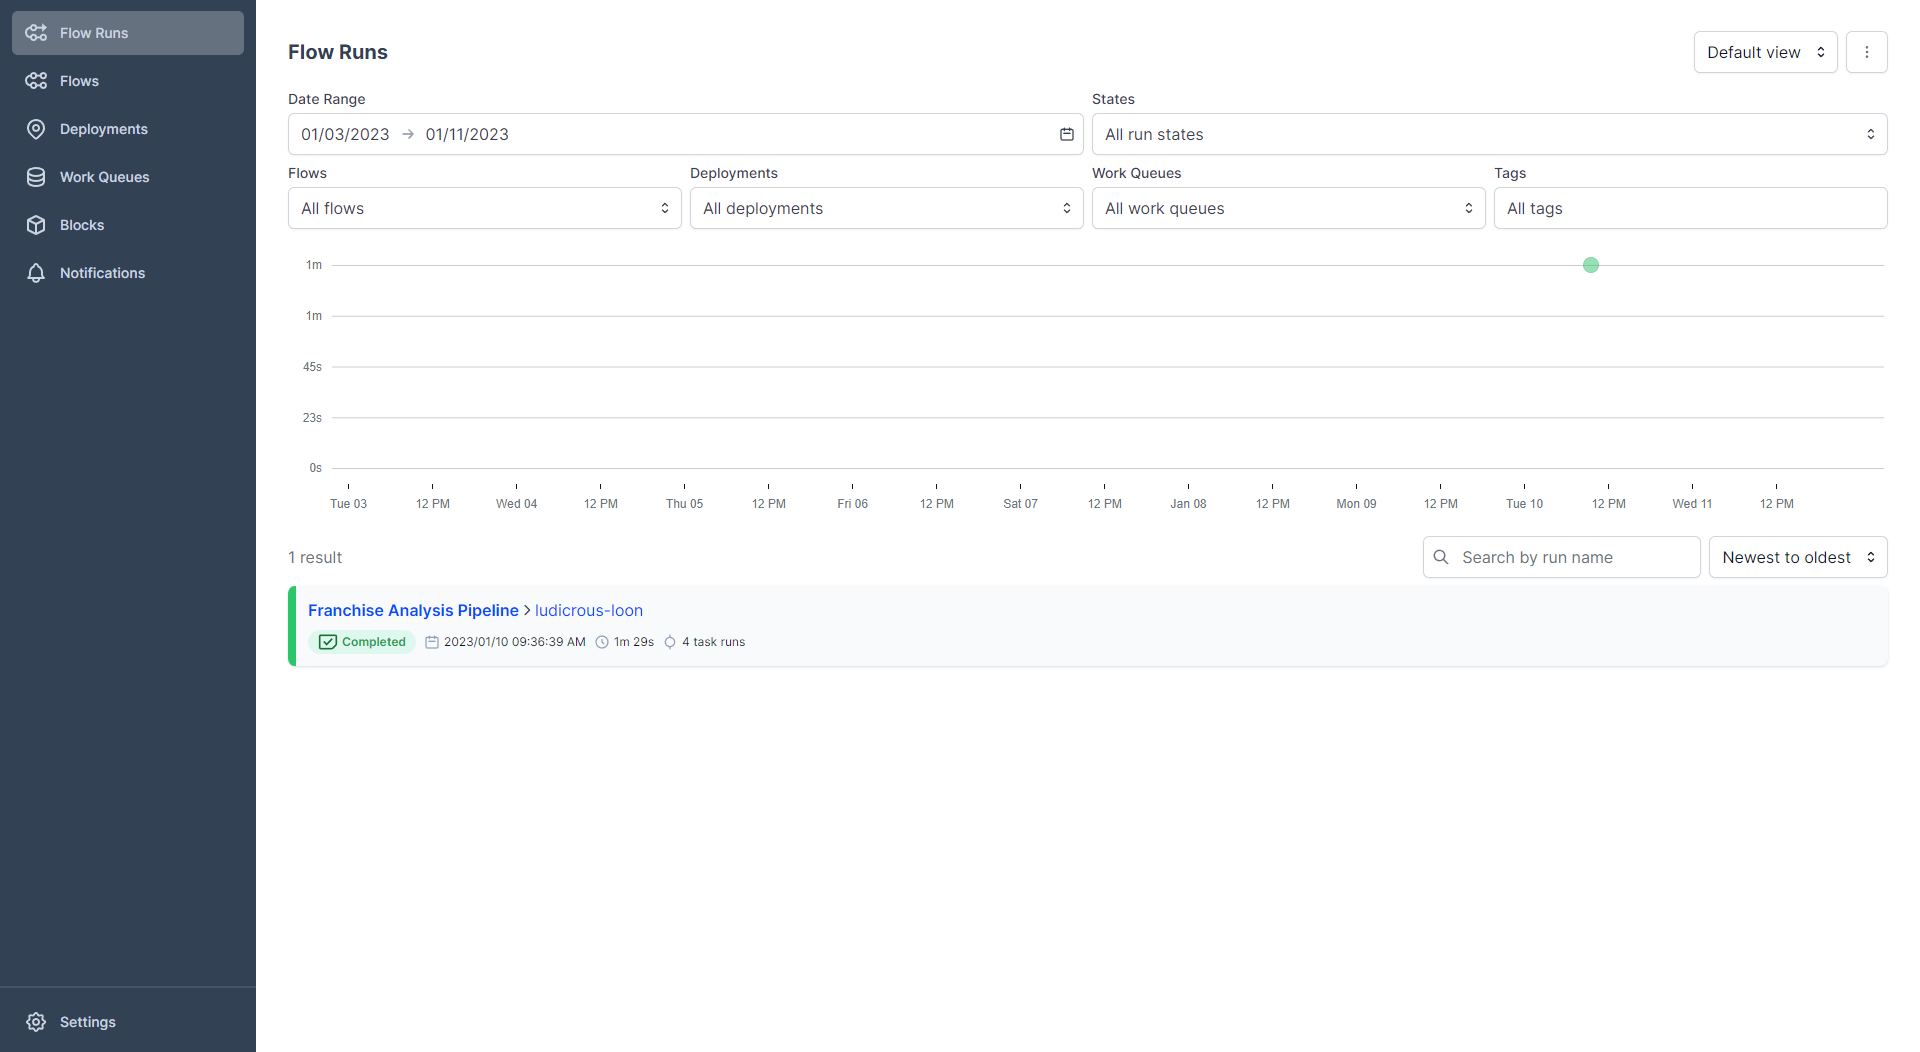
You should see a successful run, marked as completed! Also, a green dot is registered in the flow runs graph. On the y-axis of this graph, the runtime of the flow is shown and on the x-axis is the date when we launched our run. This view is useful if you periodically run a pipeline. E.g. you could use that in order to spot outliers right away. If you want to see more information about your pipeline run, click on the name of the flow. In my case, it is named ludicrous-loon. You should see a similar view as shown in figure 4.
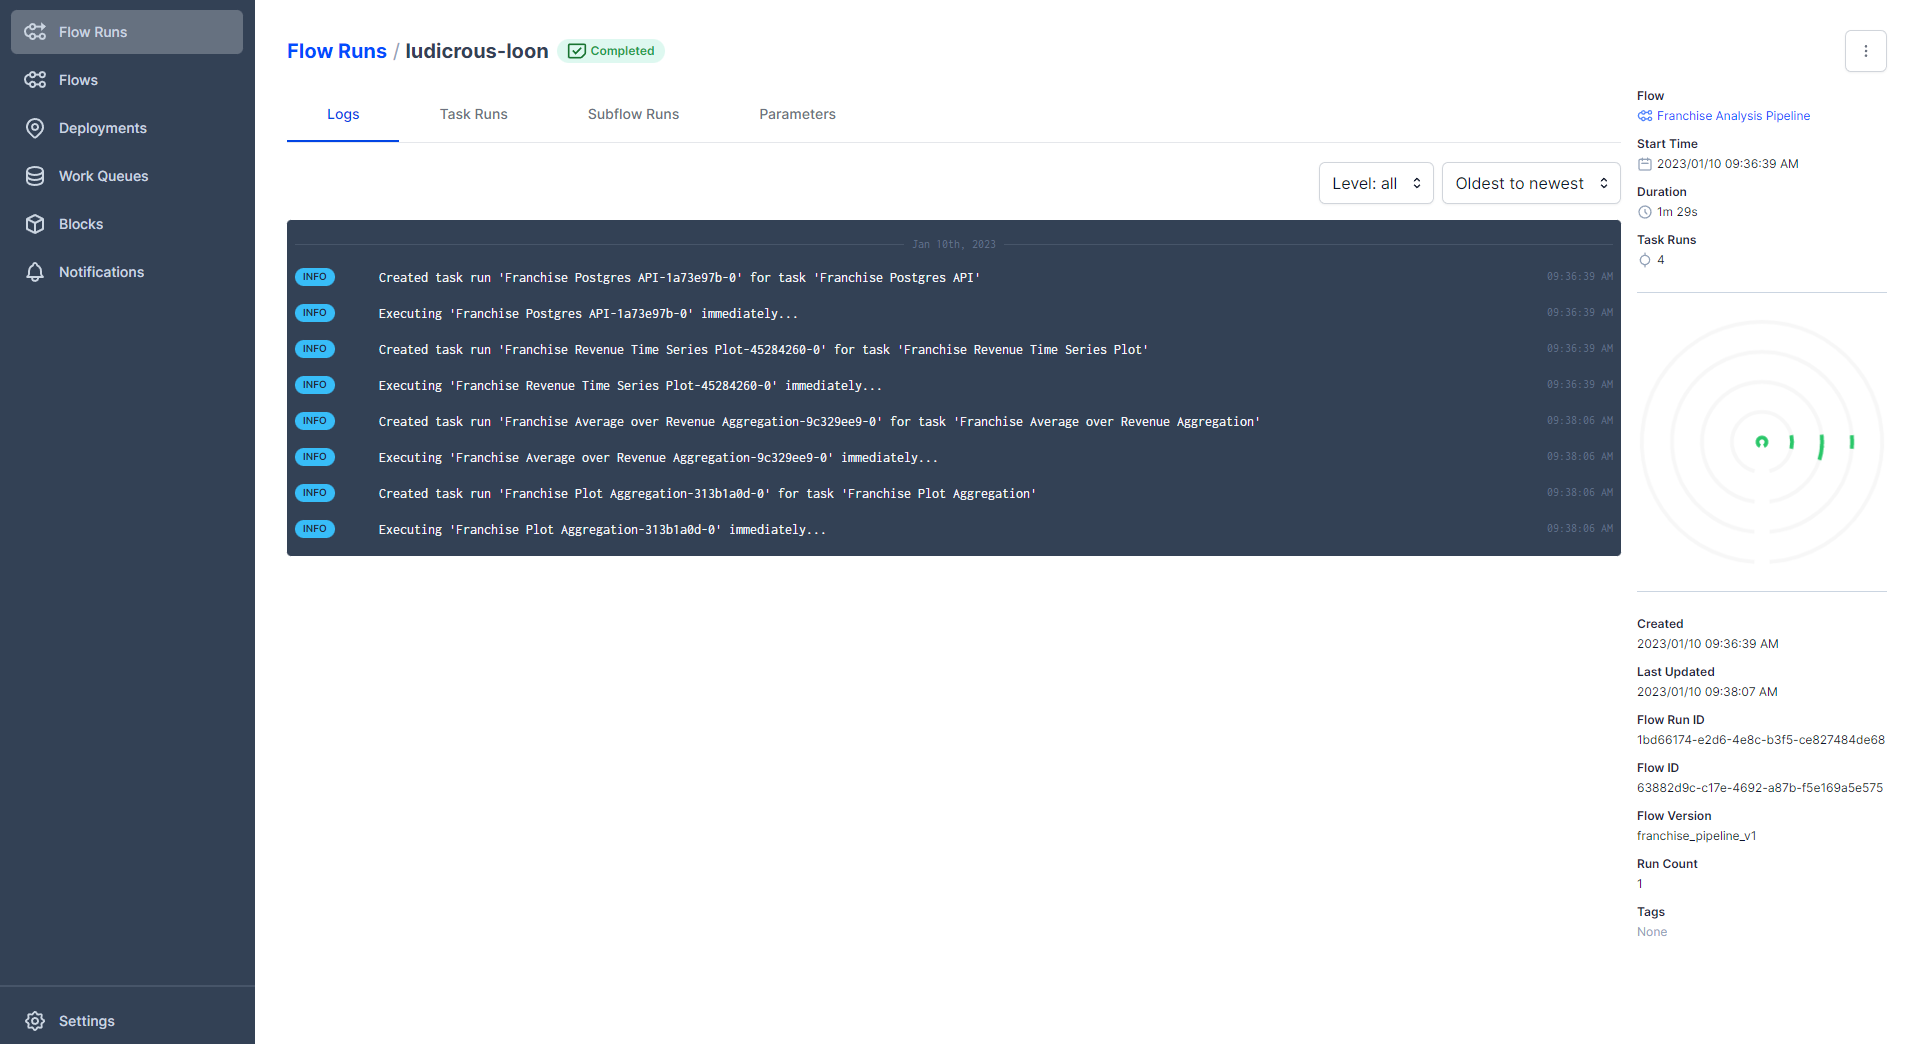
On this page, you will get more details about your run. For example, you can have a look at the logs, at the start time, when it was created, which flow version you got, and so forth. Click on the funny-looking plot on the right-hand side with green circular stripes. This is called a radar diagram. Figure 5 shows you what such a radar diagram looks like.
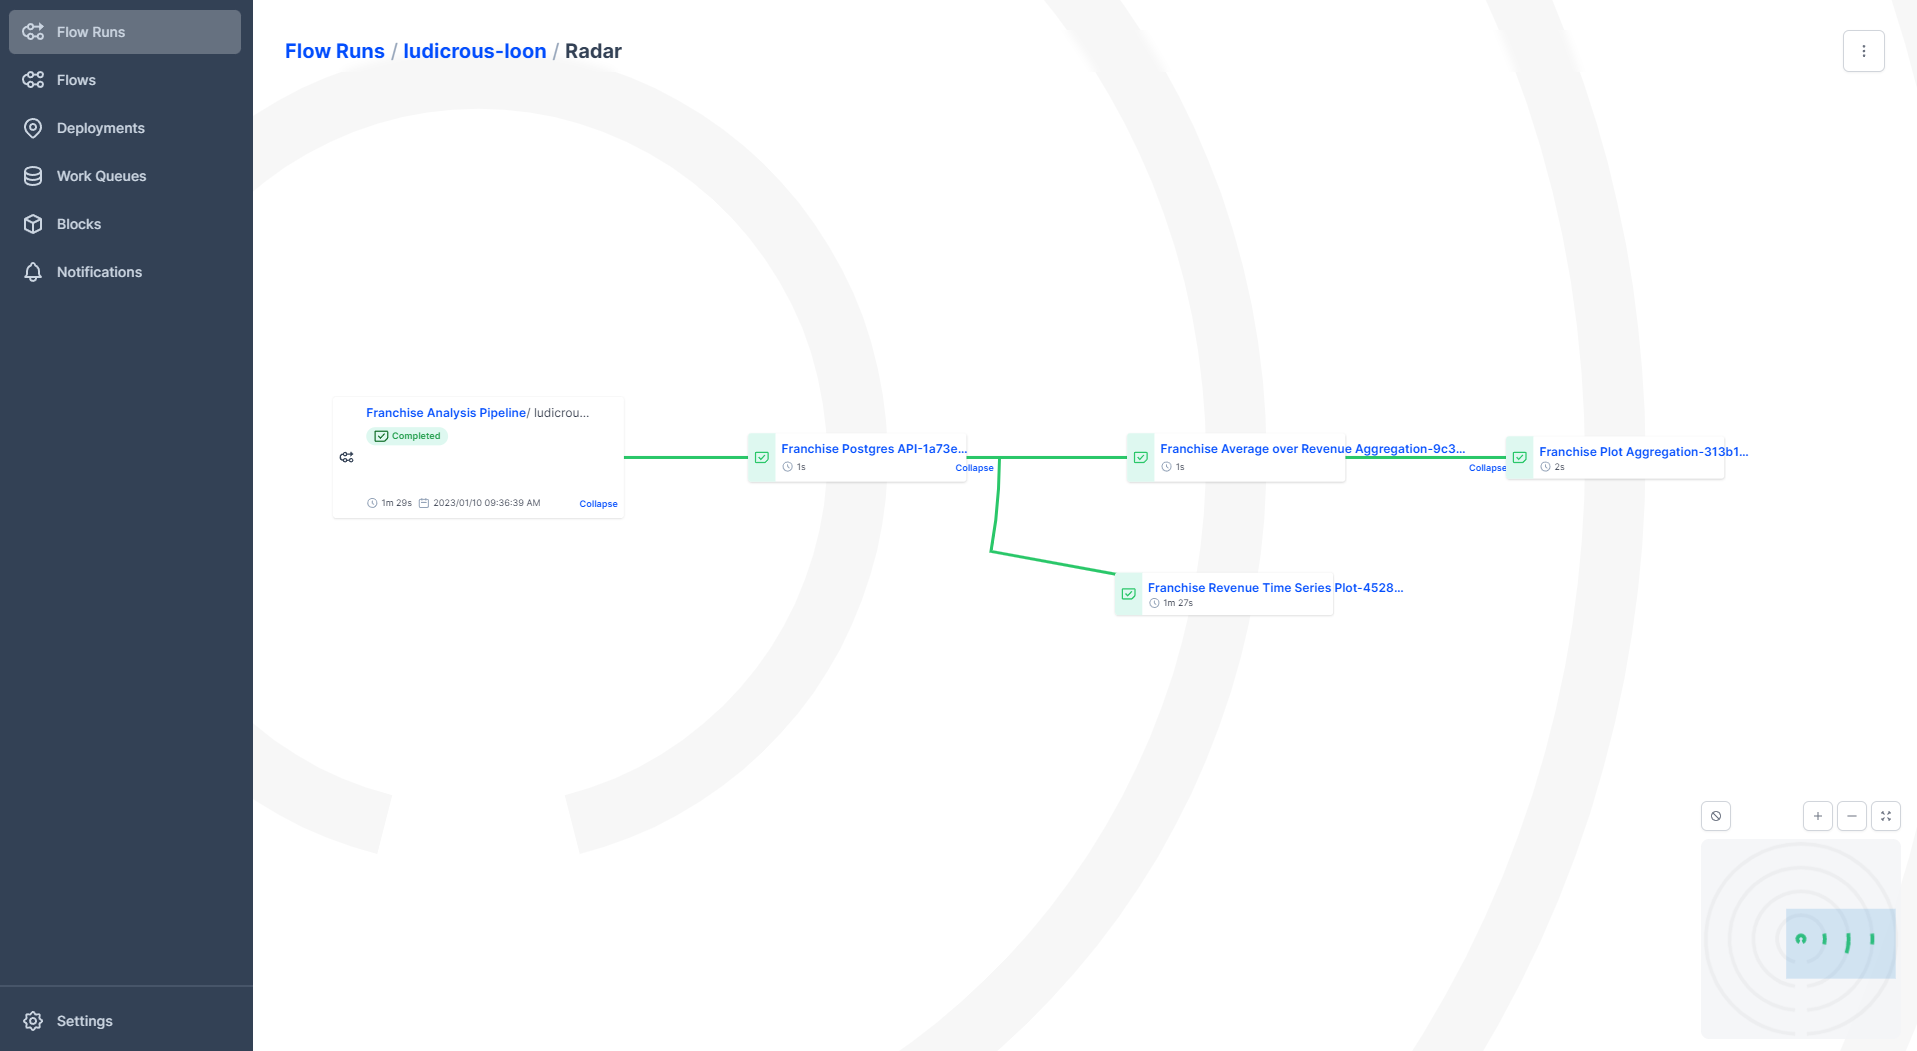
A radar diagram is quite nice since we can see how our flow progresses through each stage. We can also see how our flow is branching into multiple subbranches. The disadvantage of this plot is when you have too many branches, then this plot can look intransparent.
Moreover, I invite you once again to play around with the UI!
You might ask now: This is all good but in Airflow we could schedule our pipelines, how can I do the same in Prefect? Right, until now we never specified a schedule! So how do we do this?
Deployments in prefect
This leads us to a new concept in Prefect, called deployments. A deployment encapsulates all information related to, you name it, deployments. In Prefect it is very simple to write this deployment script. Just create a new file deployment.py in your working directory and Copy & Paste the following code:
|
1 2 3 4 5 6 7 8 9 10 11 12 13 |
from prefect.deployments import Deployment from prefect.orion.schemas.schedules import CronSchedule from . import pipeline franchise_cron = Deployment.build_from_flow( flow=franchise_analysis_flow, name="Franchise Analysis Pipeline", schedule=(CronSchedule(cron="0 7 * * *", timezone="Europe/Berlin")), version=1 ) franchise_cron.apply() |
This code is fairly simple and includes all information needed to create a deployment. For instance, we specify the flow and the schedule. Of course, you can also version your deployment. Alternatively, we could use the Prefect CLI but I like the pythonic way more. Run the following command in order to deploy our deployment:
|
1 |
python deployment.py |
Afterward, go back to the UI and click on “Deployments“ in the navigation bar on the left-hand side. You should see your deployment there. Since no run was triggered, we don’t see a lot. But some information on the right-hand side is interesting to have a look at. It shows that our work queue is the default work queue. This is interesting since Prefect works with queues and agents. For example, if we would like to run our pipeline on a dedicated machine, we would need to start an agent on that machine. The agent will check its associated queues. A queue stores deployments, the agent pulls these deployments from the queue and executes our flow at the right time. Okay, we are done, this was Prefect!
Final remarks
From what I’ve presented in this article, you might come to the conclusion, that Airflow and Prefect don’t differ that much, so why bother to compare both tools? Well, Airflow is a mature tool where you can build quite complex workflows with a lot of integrations available at your disposal. Just to mention a few integrations, when you want to submit a job on a Spark Cluster, you can use the SparkSubmitOperator, if you want to interact with Slack, you can use the SlackAPIOperator. So if you do not want to code a lot yourself, Airflow’s concept of operators might be a good fit.
On the other hand, if you really like a good testing experience and you want to run your workflows on the cloud, I can highly recommend having a look at Prefect since Prefect is easy to use and integrates well with the popular cloud platforms. Also, if you don’t want to use a managed service, then Airflow can be very painful when you try to set it up yourself. Prefect is easier to set up. If you don’t like the concept of static DAGs in Airflow, then Prefect can help you out with dynamic flows. If one of your requirements is reliability, then Prefect’s fault-tolerant scheduling might be something for you.
Take a break and make yourself comfortable because we need to implement our pipeline once again! This time in Dagster. So see you in the next part of this article series!


