In this blog post, we will implement an architecture for Angular applications that removes two sources of boilerplate from Master-Detail views using Auxiliary Routes and Resolvers.
Intro to Master-Detail views
In admin dashboard-type applications, we often display lists of data and need to provide a detailed view of an individual entry. An often-used pattern for implementing this requirement is the Master-Detail UI. This pattern provides a nice UX but the implementation often requires some boilerplate.
One source of boilerplate is needing to implement the same Master-Detail pattern in multiple pages of your application. Another is needing to handle loading and error states in the detail views.
In this blog post, we will discuss an Angular architecture for implementing Master-Detail UIs that reduces the required boilerplate using mechanisms provided by the router. As an additional benefit, we will see how we can access the state of the detail view from anywhere in our application without the need for a store.
The code as well as an interactive demo can be found on GitHub.
Swift Training
Unser Training gibt eine Einführung in die Entwicklung mit Swift und vermittelt einen Überblick über das dazugehörige Ökosystem aus Tools, Frameworks und Libraries.Implementation
Basic Structure
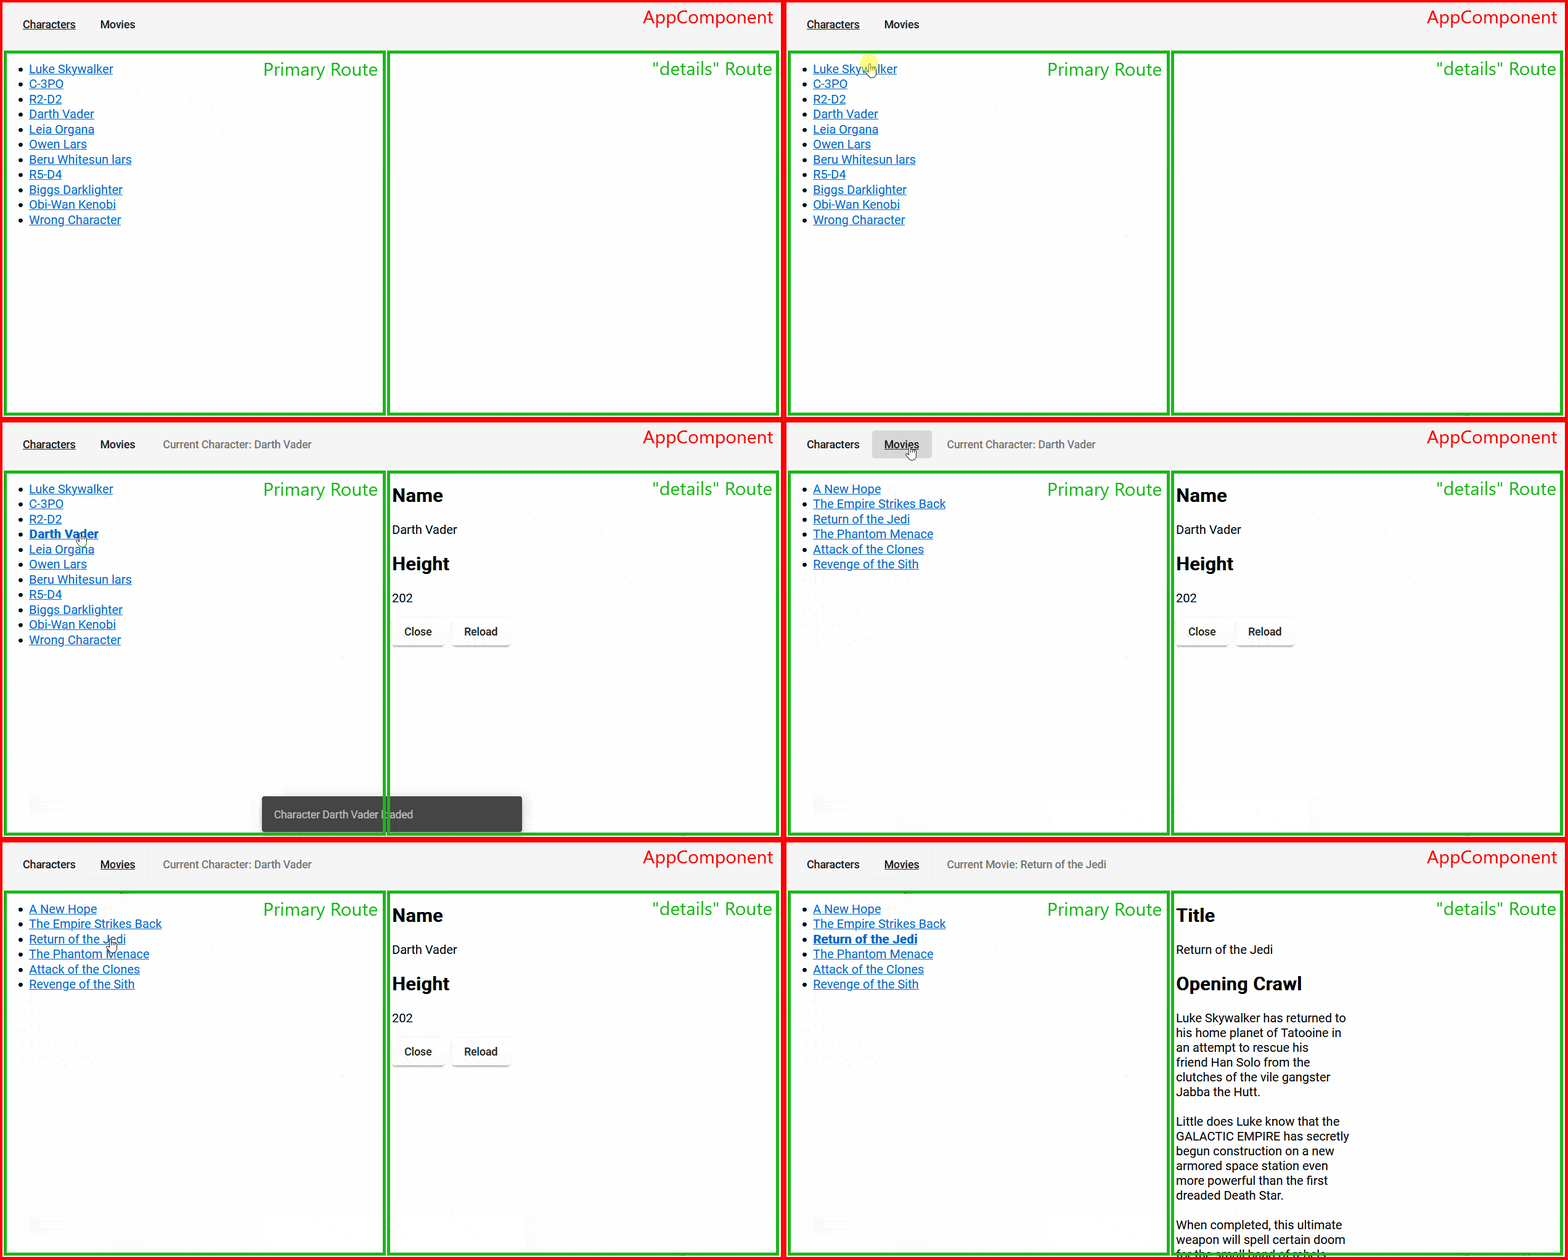
In the first step, we build a basic layout that includes router outlets for both, the master and the detail layout. We use auxiliary routes, meaning the detail views are not children of their respective master views. The “outlet“ properties of the detail routes correspond to the “name“ property of the router outlet.
The main benefit of this approach is that we only have to implement the Master-Detail styles once in our parent component. The components used by the individual routes only need to provide the content that goes inside the left and right pane. As a side effect, the detail view will stay open when you navigate to a different master view. Depending on the use case, this can be a great improvement in the useability of your application.

To open a detail route, we use router links with a special format. Below is the route we want to navigate to and the respective router link.
Let’s break down the format. The router link is an array of path segments. The first segment “/“ means that we start at the root. The second segment is an object with the single property “outlets“, meaning that we provide destinations for specific outlets separately. The keys of this object are the outlet names we defined in our app.component.html, in this case, the outlet name is “details“. The value is again an array of path segments. The path of our route for the CharacterComponent is defined as “characters/:id“ and the entries of the array „‚characters'“ and „character.id“ correspond to these segments.
We can style the currently selected item, in our example, it is bold, by applying the “routerLinkActive“ directive.
Closing an auxiliary route is possible by providing “null“ as the value for the respective outlet’s path.
Loading Data for the Detail Views
In our architecture, loading the data is not the responsibility of the component but rather a class that implements the Resolve<T> interface. The interface has only one method named “resolve“ that needs to return an Observable, a Promise or an instance of T. In this method, we have access to the route that is being navigated which can be used to access path or query parameters.
In our case, the resolver is very simple but it does not always have to be. If the component requires data to be aggregated or transformed, it is a good idea to put the logic inside the resolver and keep the component simple. If the logic is sufficiently complex, it can be a good candidate for a unit test.
The route configuration needs to be extended to reference the resolver.
In our component, we access the loaded data using the route’s “data“ property which is an Observable. Note that it is not required to unsubscribe from this Observable, as the component class and the ActivatedRoute object have the same lifecycle.
For a good UX, we want to handle loading and error states. In the traditional approach, where the component is responsible for fetching its data, this would be a source of boilerplate. However, in our architecture, we can put this logic in one central place, removing the need to handle it in the components.
For our example, we will use the @ngx-loading-bar/core library. We include the loading bar in our AppComponent’s template.
Next, we introduce a base class for our resolvers that handles loading and errors.
The resolve method now delegates the actual fetching of data to an abstract method implemented by the subclasses. Before returning the result, the loading animation is started. The result is converted into an observable and two operators are applied, “catchError“ for displaying a material snackbar when an error happens and “finalize“ which is used to stop the loading animation when the result is ready.
Our actual resolvers need to extend this class.
Below we can see the result in action.

Triggering a Reload
In some cases, we might want to trigger a reload of the data. This can be achieved by first setting the “onSameUrlNavigation“ property to “reload“ in the RouterModule.
This change does not do anything on its own. However, in combination with the route config’s “runGuardsAndResolvers“ property, we can use it to make resolvers run again when we navigate to the currently active route. However, we cannot set the property statically as it, unfortunately, would also make the resolvers run when we navigate to a different master view while the detail view is active. To work around this problem, we want to set this property at runtime only when we want to trigger a reload.
A service class “RoutingService“ implementing this logic is available on GitHub. Feel free to copy the class to your project. In our component, all we have to do to trigger a reload is to call the “reloadDetails“ method on the RoutingService instance injected in the constructor.
Access to Current State
In some situations, we might want to access the current state, i.e., the result of the resolver of the currently active detail view. Traditionally, this would be achieved using a store. However, in our architecture, the state can be accessed using nothing but the router. Again, the code is available on GitHub in the form of the RoutingService class. It provides a getter property “detailsData“ to access the currently active route’s data as well as an observable version “detailsData$“ that emits whenever navigation is completed.
Discussion
In this blog post, we have implemented an architecture for Angular applications that removes two sources of boilerplate from Master-Detail views: having to reimplement the layout on different pages and having to handle loading and error states in the detail views. The architecture offers the possibility to access the detail state anywhere in the application removing the need for a store.
Of course, this architecture comes with some compromises. Because the loading and error states are pulled out of the detail views’ components, the previously active detail view will stay visible while the next one is loaded or when it fails to load. This might or might not be a problem depending on your requirements. Having to implement a resolver for every detail component can be seen as boilerplate, though I would argue that it is outweighed by the benefits of separating the concerns of fetching and displaying the data as well as the testability of the resolver services.
Like with everything in programming, the proposed architecture will fit some use cases better than others and should be seen as an additional tool in your toolbelt.


