
In this blog post we would like to introduce you to a custom software we built to automate the deployment process of embedded systems which function as Azure IoT Edge gateways in the Smart Building project.
Introduction
In our Smart Building project, we use IoT Edge gateways as intermediate devices between controllers and Microsoft Azure to allow filtering, analyzing and further processing of incoming data. You can read more about the Smart Building project in this article.
Every gateway device runs a custom Linux image created with Yocto which comes pre-installed with all the required software, like Docker, the Azure IoT Edge Agent (which we also run from a custom Docker image) and Avahi, to name just a few.
Building the Linux image from source takes about 5+ hours on our dedicated Smart Building GitLab runner which has 16 CPU cores and 16 GB of RAM. This is only necessary when releasing new software versions for production, though. For development images we use caching which dramatically reduces the build time to about 60 minutes.
Every gateway needs its own individual credentials for authenticating with Azure and communication with the microcontrollers. Those credentials need to be baked-in into every device’s OS image. So, for example, if we want to set up three new Edge gateways, we would need to build three different images, with each one having its device-specific credentials built-in.
Assuming we would build these images sequentially, the build process would take a minimum amount of 15 hours. That is a long time, and the images would still need to be flashed onto the devices.
So for us, it was clear that we needed a solution that scales better than that and is a little bit more elegant.
Our idea for a better solution
We needed a generic image that could be flashed onto every device and a software which provides each gateway with its specific credentials.
Mender was already a core component of our infrastructure at that point. We checked if Mender had a functionality to deploy different variables to the devices based on manually entered values. That would have allowed us to manually provide the credentials, ready to be picked up by the devices the next time they connect to Mender. But unfortunately, that was not the case.
Another idea was providing custom data while flashing the devices. This assumes that everybody flashing a gateway has to install our custom software locally on their computer, which we think is not the best solution. We want to make the user experience as good as possible. Having another layer of software on the end user’s computer is not part of that.
We needed a central service the devices can connect to and that gives them the information they need.
So as a result, we decided to build our own software providing exactly what we needed: Easy, user-friendly provisioning of device-specific information for generic gateways at runtime.
Workflow of the Gateway Provisioning Service
First, we thought of a process of how to allow new devices to register themselves with our service (which we later called Gateway Provisioning Service, short GPS) and how the service registers the device with Mender and Azure IoT. Of course, we do not want foreign devices or users to be able to connect with our service and in turn get credentials for our resources. There should be a manual one-time approval of new hardware to prevent this.
The overall application flow should look like this: After the new gateway gets authorized by a colleague, the service registers the device with Mender, Azure IoT and also fetches a certificate from our Vault server. The Gateway Provisioning Service then returns the manually set device name from the authorization step, credentials for Azure IoT and the certificate to the requesting device which is then able to finish the provisioning process and connect to our IoT services.
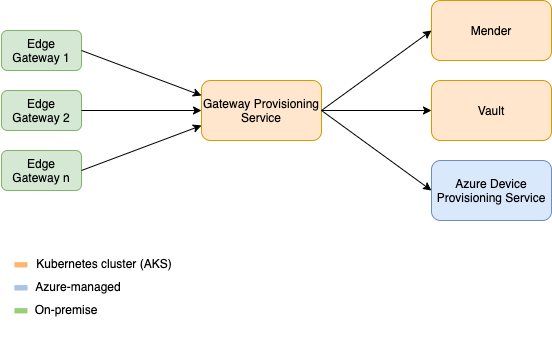
Architecture of the GPS and connected services
Details on the provisioning process
The Gateway Provisioning Service consists of three main components: The server, the client and the frontend.
The server component was the one we started with in order to realize the most important functionality and to implement our idea of the API. We then developed the client shortly after, which is integrated into our Linux image.
The client is started automatically via systemd when the device is not provisioned, which, of course, is the case after the first boot. The Mender client generates a private key for use with Mender. We also use that key (the public part) to uniquely identify the device and to register it with Mender later on. The client then connects to the Gateway Provisioning Service server and transmits its public key and MAC address.
The requesting device is then added to the server’s internal list of pending devices which can be authorized via the frontend component. The gateway clients are polling the server every few seconds to retrieve their current authorization status.
The frontend is a simple web interface showing all pending (not authorized) devices which have connected to the server. The site presents the device’s MAC address, its public key and a timestamp of its last activity to allow the user to easily filter out eventually older devices. The user can enter a custom, human-readable device name into a text box and accept or dismiss the device by clicking the appropriate button. Entering a name and clicking the accept button authorizes the device via the REST API.
The device name is used later on as a display name in both Mender and Azure to allow easy identification of devices. Of course, we also check if the entered device name is still available in Mender and Azure and return an error message to the user otherwise.
When an authorized device then connects to the server, the latter runs all steps required to register the device with our IoT services. These steps include the following:
- The device’s public key (generated by the Mender client) is sent to the Mender server along with its MAC address to pre-authorize the device in Mender. That means the device will be able to successfully connect to the Mender server from now on to check for available updates.
- The GPS server generates two random symmetric keys (primary and secondary) for use with the Azure Device Provisioning Service. We will use that service later to provision devices with Azure IoT Hub which is the core component for working with incoming sensor data from the microcontrollers.
The server then sends the two generated keys along with the user-submitted device name to Azure DPS to register it. - The last step is requesting a new device certificate from our Vault server. We use Vault’s REST API to issue a certificate and in turn get the asymmetric key pair along with the issuing CA’s public key. Vault automatically signs the device certificate with our Intermediate CA.
After those three steps completed successfully, the server compiles a JSON-serialized response containing the associated device name, the primary Azure DPS symmetric key and the certificate data and returns it to the client. If a step fails, the server returns an error message to the client which will then try again later.
Back on the client side, the provisioning software parses the response received from the server and writes the individual data onto the disk.
The provisioning client then restarts the Mender and IoT Edge services and successfully exits. Mender is restarted because the client can then directly connect to the Mender server without waiting for the next polling interval. We also need to restart the IoT Edge service so it registers the now present authentication data on disk. The certificate data is mounted into the IoT Edge Docker container as files (whose usage is pre-configured in our IoT Edge config file) and the device name and symmetric key are transferred as environment variables. That data can then be used by the IoT Edge Agent running in the container.
The IoT Edge Agent handles further provisioning with Azure DPS and IoT Hub and the deployment of IoT Hub modules which can be set via the Azure portal or Azure’s REST API. Read the next chapter to see how we use that functionality to deploy essential modules on gateway devices.
The process of device provisioning is now completed and the device is able to communicate with Mender and Azure IoT Hub.
Deploying essential modules on gateways
The gateway is now registered in Azure IoT Hub but we still need to deploy a specific module on the device. That custom module manages the relation between a microcontroller and a gateway. In Azure, every microcontroller needs an associated gateway to be able to send its sensor data to the cloud. So when a new microcontroller is set up, it automatically connects to the module running on the local gateway as a container and the module sets the relation via Azure’s REST API.
The problem here is that you need to include the module into the gateway’s deployment manifest which is only settable via Azure IoT Hub. The Gateway Provisioning Service however only registers the gateway in Azure DPS, so the device is non-existent in the Azure IoT Hub until it connects via the IoT Edge Agent. So in order to set the deployment manifest, we need to wait until the gateway connects to Azure DPS and is then provisioned in the Azure IoT Hub.
To do that, the GPS server starts a background task after the basic provisioning has successfully completed (meaning the server returned a successful response to the client) and continuously checks whether the appropriate device is already assigned to an IoT hub (which occurs after successful provisioning of a gateway via Azure DPS). As soon as that is true, the server sets the deployment manifest containing our module in the Azure IoT Hub via the Azure REST API.
The module is then deployed on the device shortly after.
Implementation and infrastructure
Last but not least, we will give you a quick insight into the programming languages and frameworks we used and the Operations side.
We built the Gateway Provisioning Service server component with .NET Core 3.1 in C# while the client is a simple Bash script consisting of just around 80 lines of code. The frontend is implemented with the JavaScript framework Svelte.

Frontend UI showing a pending device
Server and frontend are published as Docker images which are automatically built by our GitLab CI/CD runners on every git push using Kaniko. Images designated for production are pushed to our Azure Container Registry afterwards.
We run those images in the Smart Building Kubernetes cluster managed by the Azure Kubernetes Service. The services routing traffic to the pods are exposed via nginx ingresses which are available via a public AKS TCP load balancer.
Of course, HTTPS should be used for all outside connections, so the nginx ingresses are responsible for TLS termination. The certificates are issued automatically via Cert Manager.
Conclusion
We needed a solution for easy and user-friendly provisioning of new Edge Gateways. The two main requirements were the ability to use one generic image for all devices and the dynamic acquisition of device-specific information, all while maintaining usability.
With the Gateway Provisioning Service, the team developed a custom solution to solve the problem, allowing exactly what we needed.
Not only have we realized a new product but we also learned a lot while building it. Developing the essential structure and implementing it to get a working software, while facing the usual problems you get in an IT project, was a fun but also challenging responsibility in the context of the Smart Building project.


