Notice:
This post is older than 5 years – the content might be outdated.
Since early 2018, Google’s Flutter has been hyped by the community. Google claims that it provides the opportunity to build cross-platform applications for Android and iOS from a single codebase in record time. Later, after the Flutter live event in December 2018, the Dev Team announced that was not only designed for mobile applications (for details see final comments).
What is Flutter and Why Does It Use Dart ?
Flutter is a framework to develop cross-platform applications from a single code base. An application is written in Dart and exported to the desired platform. Flutter uses Dart for many reasons, the most important one being the performance increase that comes with Dart. The performance increase is based on features such as AOT (Ahead Of Time) compilation, JIT (Just In Time) compilation, garbage collection management and many more.
Introduction
Flutter is an open source Google project to build cross-platform applications. So—what does Flutter do better than established frameworks like Ionic, Xamarin, NativeScript and React Native? The answer is simple: Flutter is compiled AOT (Ahead of Time) into native code, while rendering and access to platform services are managed inside the app. No translation to Javascript (bridge) is required, like in the frameworks mentioned above.

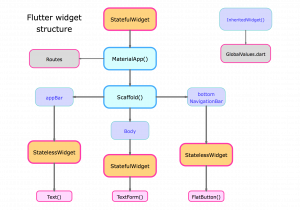
Widgets describe what their view should look like given their current configuration and state. Flutter uses the concept of widgets for every aspect of UI screen representation. Beginning with the main MaterialApp() widget that contains the complete application and ending with a single Text() widget which can hold a standard String. Widgets can be of different types, either to present or structure data, comparable to views in Android or UIViews in iOS.
Widget Types:
- Visual (animations, hero)
- Structural (scaffold, container)
- Platform (cupertino)
- Interactive (text-form-field, flat-button)

Widgets are the core concept of this framework, they manage everything in the application. In order to do that Flutter uses different kinds of widgets, where not every widget needs a state to hold the context of the application.
For example, a custom widget which does not change its behavior during the lifetime of the application can be wrapped in a „stateless widget“. If a widget needs to hold or display data on screen it has to be wrapped in a „stateful widget“. A „stateful widget“ gives the developer the chance to manage the state of the widget as required.
Widgets by State:
- Stateless (no state updated)
- Stateful (state update on setState())
- Inherited (data sharing along the app)

The popular phrase among Flutter developers, „Everything is a widget“, stems from this generic concept of widgets. They are used to display and share data within the application and to structure the screen layout. To get started, the Flutter Dev Team provides a simple tutorial with the installation guide.
Setting up Flutter
- Download SDK for your operating system.
- Install SDK, update the system path as described in the instructions.
- Decide which IDE to use, where to build and run the applications.
- Set-up emulator/simulator, prepare to test the application.
- Set-up IDE, install the Flutter and the Dart plugins.
After the download and installation are completed, we can create a Flutter application in our desired IDE.
Running Flutter
- Start a Flutter project: creating a new project will build the Increment-App.
- Testdrive: select the emulator/simulator or a real device (target selector) and run the app.
- Overview: structure of Flutter application is divided into 5 directories.

All the Dart code to build an application is located in the lib directory (public library). External libraries, dependencies, assets, fonts, audio and video are registered in the pubspec.yaml file. Any application today uses powerful third party libraries, therefore Flutter uses packages collected at the Dartlang website with a standard procedure of „how to include the dependencies“.
Any Flutter application starts at the main.dart file, where the MaterialApp() is initialized and started. The MaterialApp() is the root widget, it holds the title, the home widget, the routes and many more attributes.

So, the basic setup is done, we know what a widget is and where we have to place our production code. But we’re still missing the the knowhow of testing, design and the full range of available widgets. You can find all official widgets at the Flutter website. Also, while I’m writing this blog series you will find a widget of the day in my twitter feed:
Final comments
Flutter is promoted as a new way of thinking about platform driven development. The future of this framework is unknown but the set course points into the direction of becoming a huge game changer. For Example, there is „Hummingbird“, Google’s Flutter approach to web development, and there’s a desktop version in the pipeline as well.
This has been just a brief introduction, but in my forthcoming articles I will dive deeper into design and implementation of a basic application and share my impressions.
All Articles in this Series
Read on
Find out more about our Android and iOS portfolio or join us as a mobile developer!


Thank you. Would be awesome to see you build many little apps in wich is use a particular widget at time, for specific purpouse, like hero, animated container, how to routes for differents screens. Loving your teaching style.
I must be an clairvoyant =).
Today we will launch the next article about navigation etc. and I got a prototype micro app in the pipeline. The micro app will cover almost every thing you ask for.
happy coding =)