Notice:
This post is older than 5 years – the content might be outdated.
Building complex applications in Flutter demands a basic understanding of the core concepts. Those concepts include the navigation between screens or saving simple key-value pairs. In this article I will show three of the most common concepts every developer should know.
Before We Are Getting Started
Since Flutter is a cross-platform solution to build mobile applications, it inherits some of the platforms‘ individual concepts. For example, Android provides access to the SharedPreferences API, and iOS uses UserDefaults API. Both provide an interface to the system memory.
Flutter’s basic concept is based on plugins, which we can use to access functionality on both platforms. Plugins extend the core features of the provided Flutter framework in the form of basic packages or third party libraries.
RIP: Three Basic Concepts for Flutter
It is fundamental to know a minimum of basic concepts in every framework. In this article I call this abstract concept RIP. RIP is not an official definition but it will help you remember as soon as a new framework pops up. It excludes REST API calls and any other external interaction, as those features are usually included by third party packages (http or jsoup).
RIP stands for
- Responsiveness
- In app routing
- Persistence
It covers the three most common tasks which have to be handled in any application. With more time and experience we will discover other strategies or designs to build the same functionality.
Responsiveness
A responsive UI is a minimum requirement and needs to be handled with great care. It demands a clear vision of what the app should look like and more importantly, how the app should behave (state management).

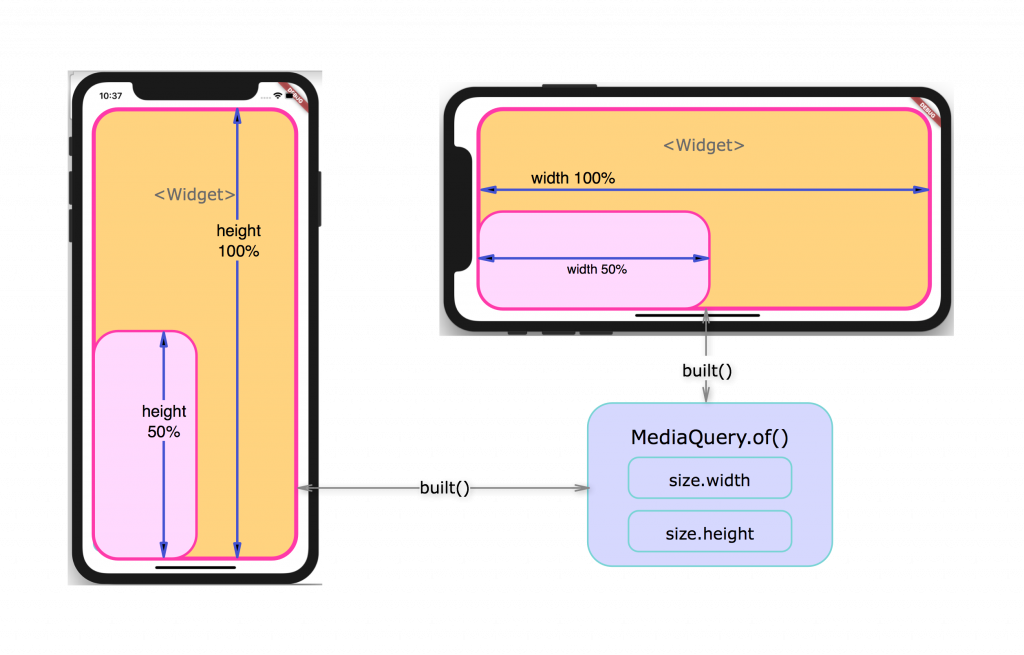
In Flutter we have various options to build a responsive UI, as explained in the Flutter GitHub repository from Ian Hickson: Either with the implementation of a LayoutBuilder or the MediaQuery. In this article we will concentrate on the MediaQuery to create a responsive test widget.
Initial application setup
|
1 2 3 4 5 6 7 8 9 10 11 12 13 14 15 16 17 18 19 20 21 22 23 24 25 26 27 28 29 30 31 32 33 34 35 36 37 38 39 40 41 42 43 |
import 'package:flutter/material.dart'; import 'package:flutter/widgets.dart'; // create test widget with associated state class TestWidget extends StatefulWidget { @override State <StatefulWidget> createState() { return TestState(); } } // associated state to widget class TestState extends State < TestWidget > { // todo: add width and height later here @override Widget build(BuildContext context){ // add MediaQuery.of(...) // return any widget with fixed dimensions return Container( height: 400px, width: 200px ); } } |
The TestWidget shown above consists of a simple container with fixed dimensions. To transform this widget into a responsive widget, we are calling the MediaQuery.of() method from Flutter’s core package. The method provides the size and orientation of the application (screen) with each build of the widget. The build function is called with every state change. For example, the state changes as soon as the orientation of the application (screen) changes. This state change causes the widget to rebuilt and recalculate the dimensions of the widget.
Call MediaQuery.of() to get screen size as per state
|
1 2 3 4 5 6 7 8 9 10 11 12 13 14 15 16 17 18 19 20 21 22 23 24 25 26 27 |
// TestWidget double myHeight = 0.0; double myWidth = 0.0; @override Widget build(BuildContext context){ // calculate present state screen size this.myHeight = MediaQuery.of(context).size.height; this.myWidth = MediaQuery.of(context).size.width; // return widget with dimensions as per state return Container( height: this.myHeight, width: this.myWidth ); } |
From here on it is possible to either trickle down the height and width or to create a child with the max size of the parent. A proper widget tree planning is crucial at this stage, because the size of all child widgets depends on the parent’s container dimensions. More references about layouts and responsive UIs in Flutter can be found at the end of this article.
In-App Routing
The navigation through application screens can be managed with two routing options.
- Routing with defined routes
- Routing without defined routes
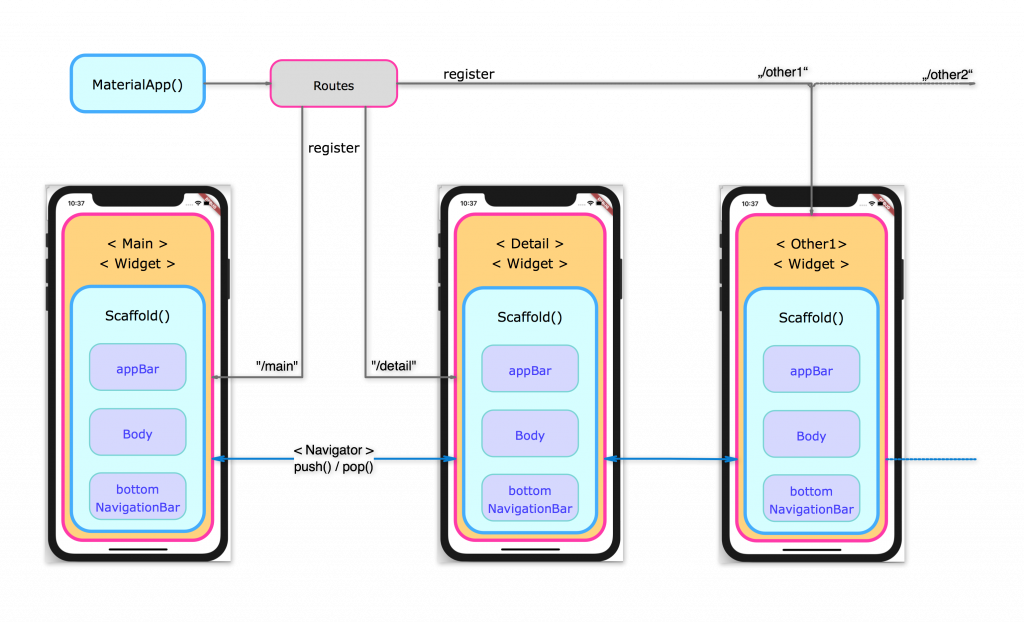
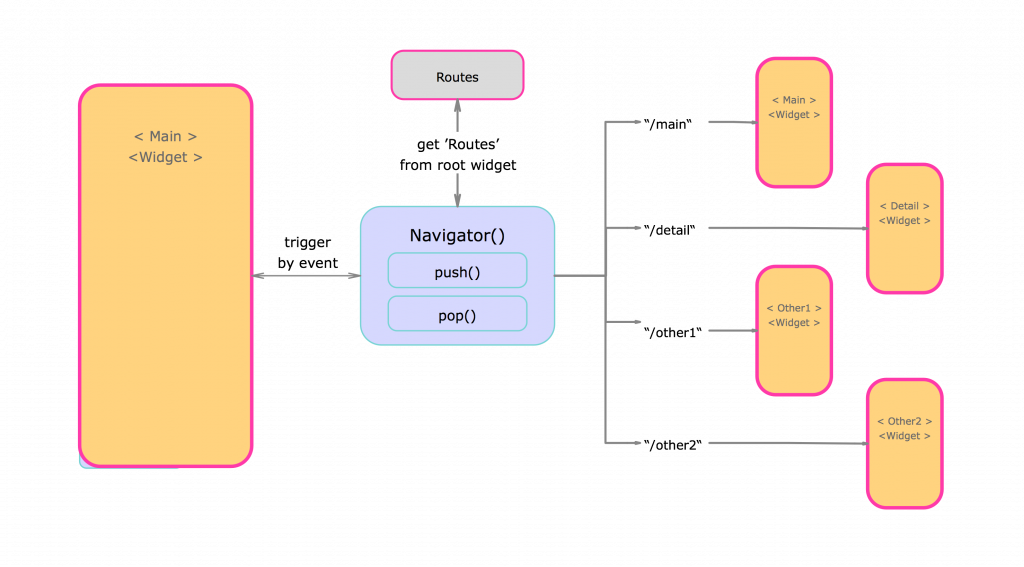
Routes define a UI representation of a widget and help to keep the code organized. All routes a registered in the root widget (MaterialApp()) and can be retrieved from any point in the application with the Navigator.

Create, import screens and define routes in MaterialApp()
|
1 2 3 4 5 6 7 8 9 10 11 12 13 14 15 16 17 18 19 20 21 22 23 24 25 26 27 28 29 30 31 32 33 |
import 'package:test/TestWidget.dart'; import 'package:test/MainWidget.dart'; import 'package:test/DetailWidget.dart'; import 'package:flutter/material.dart'; import 'package:flutter/widgets.dart'; // starting point of the application void main() => runApp( MaterialApp( title: "TestApplication", initialRoute: "/", routes: { "/": (context) => MainWidget(), "/detail": (context) => DetailWidget(), "/test" : (context) => TestWidget(), }, ) ); |
Register the routes in the MaterialApp() root widget

Navigation with named routes
|
1 2 3 4 5 6 7 8 9 10 11 12 13 14 15 16 17 18 19 20 21 22 23 24 25 26 27 28 29 30 31 32 33 34 35 36 37 38 39 40 41 42 43 44 45 46 47 48 49 |
import 'package:flutter/material.dart'; import 'package:flutter/widgets.dart'; class MainWidget extends StatefulWidget { @override State<StatefulWidget> createState() { return new MainState(); } } class MainState extends State<MainWidget>{ @override Widget build(BuildContext context) { // app will be a single centered button in a structured scaffold return new Scaffold( body: new Center( child: FlatButton( child: Text("PUSH"), onPressed: () { // navigate to next screen / widget Navigator.pushNamed(context, "/detail"); } ) ) ); } } |
The navigation with routes in Flutter runs both ways, either push to a new widget or pop back to where we came from. One little drawback exists, as I could not find a nice way to attach data to the Navigator with a named route. But in Flutter we have other concepts like streams & sinks, which I will talk about in a future article.
|
1 2 3 4 5 6 7 8 9 10 11 12 13 14 15 16 17 18 19 20 21 22 23 24 25 26 27 28 29 30 31 32 33 34 35 36 37 38 39 40 41 42 43 44 45 46 47 |
import 'package:flutter/material.dart'; import 'package:flutter/widgets.dart'; class DetailWidget extends StatefulWidget { @override State<StatefulWidget> createState() { return new DetailState(); } } class DetailState extends State<DetailWidget>{ @override Widget build(BuildContext context) { return new Scaffold( body: new Center( child: FlatButton( child: Text("RETURN"), onPressed: () { // navigate back from the widget has been pushed Navigator.pop(context); } ) ) ); } } |
Navigation without named routes
If the application does not require a pre-declared routes, it is possible to navigate directly to other screen widgets in Flutter. In this case we can use the MaterialPageRoute builder option. This builder does the same as the pre-declared routes, but only at the defined location.
|
1 2 3 4 5 6 7 8 9 10 11 |
onPressed: () { Navigator.push( context, MaterialPageRoute(builder: (context) => DetailWidget()), ); } |
Persistence
Saving simple key-value pairs is a basic feature and straight forward to implement. The standard solution will be following the 4 steps below which can be found at the official Flutter documentation.
- Include library (shared_preferences)
- Save a key-value pair
- Retrieve a key-value pair
- Delete a key-value pair
Add dependency to pubspec.yaml
|
1 2 3 4 5 6 7 |
dependencies: flutter: sdk: flutter shared_preferences: any |
Save
|
1 2 3 4 5 6 7 |
// get shared preferences final preferences = await SharedPreferences.getInstance(); // set value prefs.setString('TEST-KEY', 'test-value'); |
Retrieve
|
1 2 3 4 5 6 7 |
// get shared preferences final prefs = await SharedPreferences.getInstance(); // get 'TEST-KEY' or return default string if key can not be found final test = prefs.getString('TEST-KEY') ?? 'no key'; |
Remove
|
1 2 3 4 5 6 7 |
// get shared preferences final prefs = await SharedPreferences.getInstance(); // remove key-value pair prefs.remove('TEST-KEY'); |
Shared preferences are designed to store simple data only (primitive data types). If you’d like to store more and/or structured data you should look into Firebase or an sqlLite solution.
Conclusion
Now we are able to create and manage a responsive UI, navigate through various screens and persist simple key-value pairs. This gives us the basic tooling to create amazing but simple apps.
In the next Blog: Flutter: The Profiler (Part 3), we are looking deeper into building lightweight responsive layouts. We will build a simple profile app (master/detail), which can be seen as a prototype for many similar structures.
In the meantime, have a look at this Medium post: Flutter layout in a nutshell, or check out my other articles on Flutter.
All Articles in this Series
- Flutter: The Beginning of a New Era? (Part 1)
- Flutter: The Profiler (Part 3)
- Flutter: The Finalizer (Part 4)
Read on
Find out more about our Android and iOS portfolio or join us as a mobile developer!


2 Kommentare