Notice:
This post is older than 5 years – the content might be outdated.
Machine learning and more precisely convolutional neural networks are an interesting approach for image classification on mobile devices. In the recent past it wasn’t that easy to use a pre-trained TensorFlow CNN on an iOS device. To use such a network, the developer was forced to work with the Tensorflow-experimental Cocoapod or build the TensorFlow library from source for a size-optimized binary. It was a messy and complicated way for developers. In iOS 11 Apple introduced Core ML, its own framework to integrate machine learning models into custom iOS apps. It is also the fundament for Apple products like Siri, Camera or QuickType. The framework gives the developer an easy and clear abstraction layer to use the machine learning algorithms, without worrying about any calculation or hardware access.
Previously on this blog…
In the first blog post of this series we demonstrated how to train and deploy a model. This model is trained to recognize houseplants based on a provided image. Subsequently, we explained the integration of such a model into an Android app. The goal of this part is to use our TensorFlow MobileNet plant identification model with Core ML in an iOS app.
How Core ML works
With Core ML Apple specifies an open format to save pre-trained neural networks, the mlmodel files. Each of these files contains:
- Layers of the model,
- Inputs,
- Outputs,
- Functional description based on the training data.
This is similar to the file format of TensorFlow or Keras, with their .pb and .h5 files. One difference to these formats is, however, that the Core ML model files can be directly executed with the Core ML framework on an iOS device running iOS 11 or later. You only need to add the Core ML framework to your project as dependency—no more mess with the TensorFlow Cocoapod. Core ML also gives you, as a developer, an easy-to-use API to execute the prediction and it manages the execution swap between CPU and GPU.
Creating Core ML models
Most data scientists work with TensorFlow, Caffe or Keras to create their neural networks. These machine learning frameworks don’t export mlmodel files to use with Core ML, so Apple introduced an open source Python package, coremltools, to convert trained networks to the Core ML model file format. Apple’s package supports Keras, Caffe and scikit-learn by default. Other than the package by Apple, there are third party tools like the TensorFlow converter.
Transform the plant neural network
To transform the Tensorflow-trained plant identification model to a Core ML model we use the Tensoflow converter. The method tfcoreml.convert converts a frozen Tensorflow graph, a .pb file, to a Core ML model.
A converter Python file looks like this:
|
1 2 3 4 5 6 7 8 9 10 11 12 13 14 15 16 17 18 19 20 21 22 23 24 25 26 27 28 29 30 31 32 33 34 35 36 37 38 39 40 41 42 43 |
# converter.py import tfcoreml # Supply a dictionary of input tensors' name and shape (with batch axis) input_tensor_shapes = {"input:0": [1, 224, 224, 3]} # batch size is 1 # TF graph definition tf_model_path = './HousePlantIdentifier.pb' # Output CoreML model path coreml_model_file = './HousePlantIdentifier.mlmodel' # The TF model's ouput tensor name output_tensor_names = ['final_result:0'] # Call the converter. This may take a while coreml_model = tfcoreml.convert ( tf_model_path=tf_model_path, mlmodel_path=coreml_model_file, input_name_shape_dict=input_tensor_shapes, output_feature_names=output_tensor_names, image_input_names = ['input:0'], red_bias = -1, green_bias = -1, blue_bias = -1, image_scale = 2.0/255.0) |
You have to specify the input value with the input layer name of the TensorFlow graph, input:
|
1 2 3 |
input_tensor_shapes = {"input:0": [1, 224, 224, 3]} # batch size is 1 |
The input value is a 224 by 224 pixel image with the 3 rgb channels.
The output has to be defined by the output layer of the frozen graph, final_result:
|
1 2 3 |
output_tensor_names = ['final_result:0'] |
For the conversion we also configure how the model expects the pixel values of a plant image. In our model we expect values between -1 and 1 with an image scale of 2/255, therefore the value looks like this:
|
1 2 3 4 5 6 7 8 9 |
red_bias = -1, green_bias = -1, blue_bias = -1, image_scale = 2.0/255.0 |
After executing the conversion you get a Core ML model file, which can be used directly in an iOS app. Conversion is necessary every time the underlying TensorFlow graph is updated.
Using the model
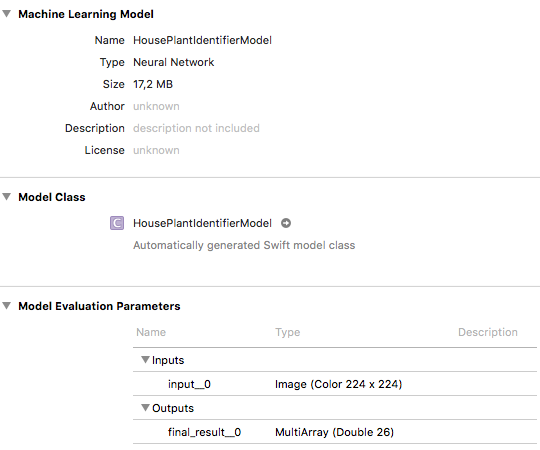
The created Core ML model file can be imported into the Xcode project. Xcode will parse it and display the input/output parameters of the model and an auto-created Swift class.

For every imported Core ML model 3 classes are created: a class for interaction with the model, a class for wrapping the input and a class for wrapping the output. The class for the interaction with the model has a prediction method, which expects an instance of the input class and returns the output class. We will use this method to run our prediction as shown in this example:
|
1 2 3 4 5 6 7 |
let model = HousePlantIdentifierModel() let prediction = try? model.prediction(input__0: pixelBuffer) let result = prediction?.final_result__0 |
We instantiate the class for the Core ML model and hand over a pixel buffer to the prediction method. The pixel buffer has the Type CVPixelBuffer and contains a 224 by 224 pixels image as required in the TensorFlow input layer. To use a UImage or CGImage instance, it has to be converted to a CVPixelBuffer instance.
The result type of the prediction has an instance variable which is named after the output layer of the model. In our model it is a Double named final_result__0, representing 26 different values as shown in the screenshot. These are the 26 different plants our convolutional neural network can detect.
It’s as easy as that. We developed a plant detection in only 3 lines of code. To display a result to the user, you only have to match the value against the list of plant names.
Conclusion
With Core ML Apple supports a very easy way to integrate neural networks in an iOS app without knowledge of the underlying functionality. The open source file format and the provided converters make it possible that no data scientist needs to know how exactly Core ML works.
Of course there some disadvantages, too: Core ML only supports supervised machine learning and the file format and the converters don’t support all layer types and all training tools. Furthermore, you don’t have the possibility to train your model on the device. However, it is an interesting framework that greatly simplifies the use of machine learning on iOS.


Please, describe the output (MLMultiArray and final_result__0) of prediction and how to ‚match the value against the list of plant names‘ as you said.
Can we convert CoreML model to TensorFlow?
You could give it a shot using onnxmltools https://github.com/tf-coreml/tf-coreml/issues/316
Apparently (https://github.com/tf-coreml/tf-coreml/issues/316) you can convert CoreML to onnx with https://github.com/onnx/onnxmltools and then to tf with https://github.com/onnx/onnx-tensorflow. But I’ve never tried it out before.
Which tensorflow version did you use?
I am having trouble running the code due to tensorflow compatibility issue